

Over-The-Air device update - IoT with C#
Developing solutions for IoT devices can be a challenging task, this can also apply for getting a device at its final destination in order to do its job. When time passes by, it is likely that either requirements or conditions are changing and that the device is not capable anymore of doing its job. In other words, it needs to be updated. This is where the real problems may start. In many cases devices are not physically accessible or there are simply too many devices in the field to do manual updates. This is where over-the-air (OTA) updates will save your day.
In this article I describe the fundamentals for an update mechanism that can be implemented using the Nano framework.
Return of the classics: Plug-ins!
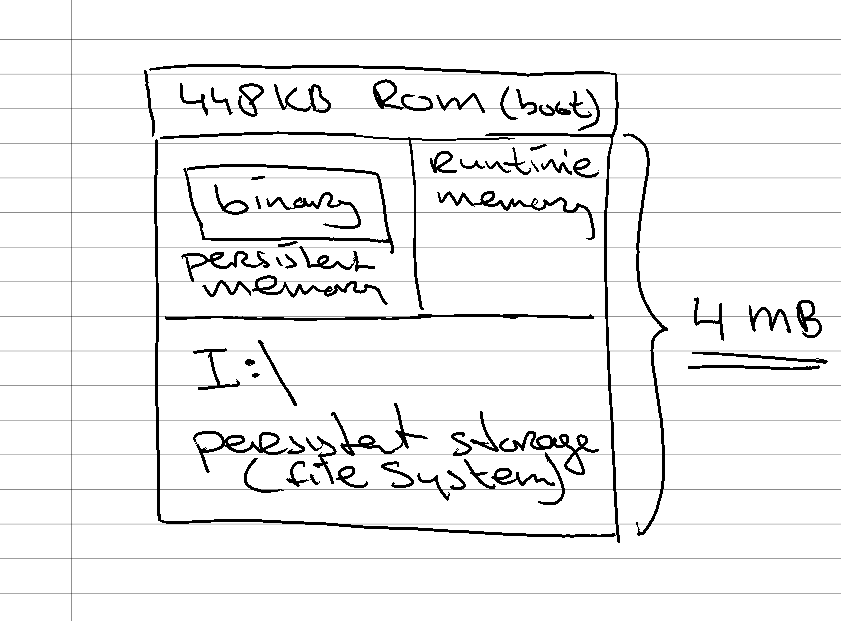
As far as my knowledge reaches when it comes to the ESP32 board, flashed with the Nano framework the board comes with 4MB of memory that can be used for persistent file storage, persistent binary memory and execution memory.
When I do an update of the executing binary and this fails, the device might end up in an unusable state. As long as I have access to the device this won’t be much of a problem. In the case the device is not accessible it is. In order to overcome this problem, I need a solid main program (which does not need to be updated) that is responsible for;
- the Wifi connection,
- the connection to Azure (disputable),
- handling of software updates,
- and finally the execution of the desired functionality.
In other words, I need to resort to a mechanism I used in the past which is basically a plug-in based architecture. In a plug-in based architecture, the main program is nothing more than an execution platform that handles a number of system tasks. Based on a round-robin mechanism the detected plug-ins are executed.
To implement a plug-in based architecture using the Nano framework, I need to do the following:
- Define an interface which is known by the host.
- Implement this interface on a DLL that will be loaded dynamically.
- Use reflection on the host to load DLLs from a certain folder.
- In case the DLL contains the specific interface, create an instance of the DLL and invoke the desired methods.
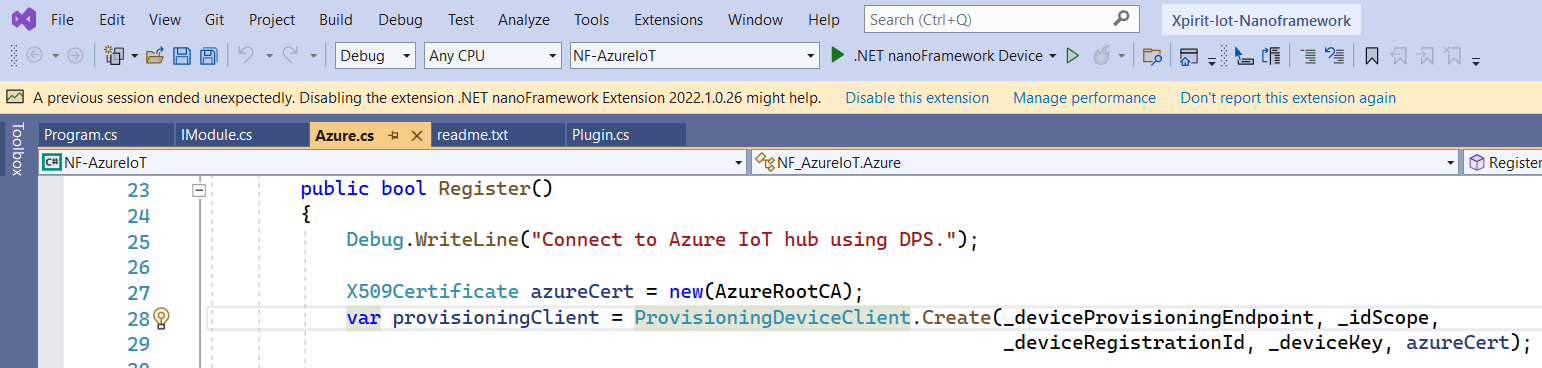
In the blog post Register ESP32 to DPS & IoT hub - IoT with C# I described how to connect the ESP32 device to the Azure IoT hub. Now that the details of the connection have been worked out, it is time for the tricky part.
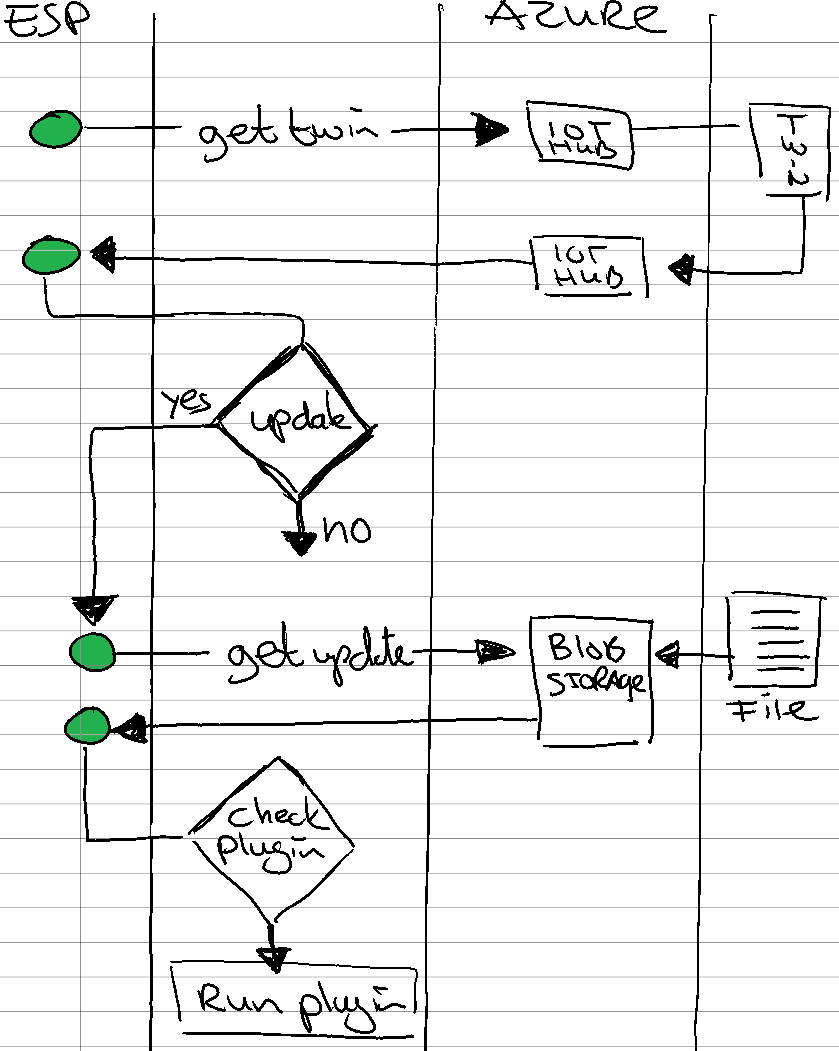
Steps required:
- Get the device twin and extract the relevant data from it.
- Download the binaries, check and store them if needed.
- Invoke the functionality of the plug-in.
Get data from device twin
The first step is to retrieve the Device Twin information from the IoT hub. In this case I’m only interested in the firmware_modules data that I added to the desired properties.
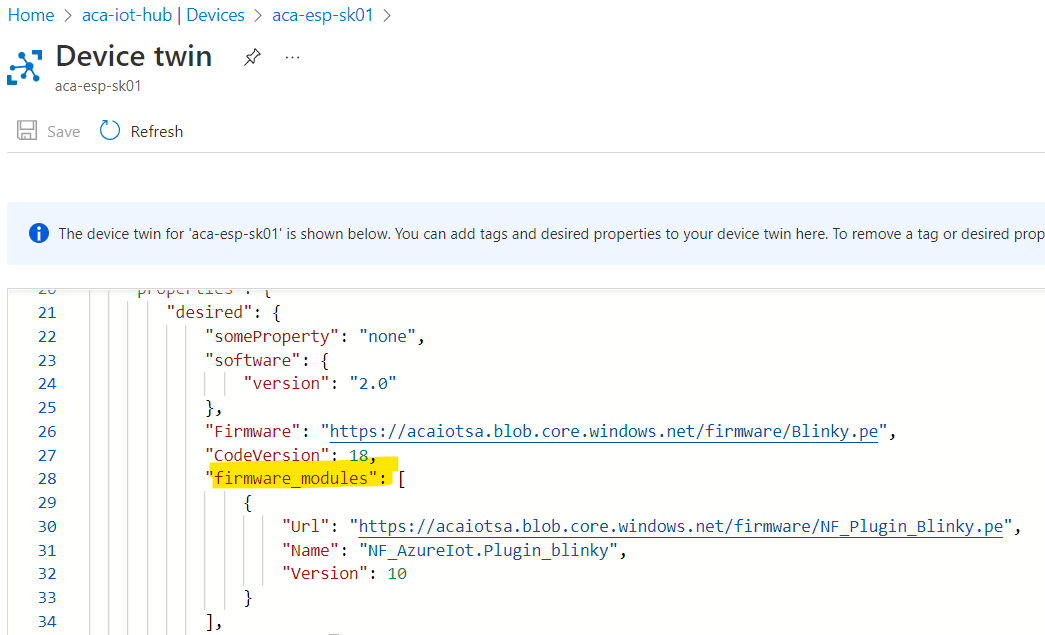
The idea of the firmware_module data in the device twin, is that I have the possibility to add additional plugins. For that I have to enter the blob storage url where the file can be retrieved from, a name for identification and a version number that can be used for version checking.
On the device I have this piece of code running that retrieves the Firmware data from the device twin.
 public class Azure
 {
    public DeviceClient Device { get; private set; }

    public FirmwareData[] GetFirmwareData()
    {
        Twin deviceTwin = Device.GetTwin(new CancellationTokenSource(10000).Token);
        TwinCollection desired = deviceTwin?.Properties?.Desired;
        if (desired != null)
        {
            var desiredFirmwares = desired["firmware_modules"] as ArrayList;
            if (desiredFirmwares != null)
            {
                FirmwareData[] firmwares = new FirmwareData[desiredFirmwares.Count];
                int count = 0;
                foreach (var desiredFirmware in desiredFirmwares)
                {
                    FirmwareData data = (FirmwareData)JsonConvert.DeserializeObject(JsonConvert.SerializeObject(desiredFirmware), typeof(FirmwareData));
                    firmwares[count++] = data;
                }
                return firmwares;
            }
        }
        return null;
    }
}

public class FirmwareData
{
    public string Url { get; set; }
    public string Name { get; set; }
    public int Version { get; set; }
}
Download binaries and replace if needed
Once the list of FirmwareData objects has been returned, it is time to download the binaries from Azure. The compatibility, version and name checking will eventually be done from the assembly that is retrieved from the blob storage. The idea is to load a byte stream, then convert it to an assembly and from there on, check if the assembly implements a specific interface.
The code below shows how to download a byte array from Azure Blob Storage. In this example I allowed public read permissions on the storage container. In order for the device to download the data from Blob Storage using an HttpClient, the connection to the DeviceClient has to be closed (otherwise no connection can be made).
public class Azure
{
    public DeviceClient Device { get; private set; }

    public byte[] DownloadFirmwareBytes(string firmwareLocation)
    {
        if (Device.IsConnected) Device.Close();
        Thread.Sleep(200);

        HttpClient httpClient = new()
        {
            SslProtocols = System.Net.Security.SslProtocols.Tls12,
            HttpsAuthentCert = new X509Certificate(AzureRootCA)
        };
        httpClient.DefaultRequestHeaders.Add("x-ms-blob-type", "BlockBlob");

        HttpResponseMessage response = httpClient.Get(firmwareLocation);
        response.EnsureSuccessStatusCode();

        byte[] bytes;
        using (var ms = new MemoryStream())
        {
            response.Content.ReadAsStream().CopyTo(ms);
            ms.Flush();
            ms.Close();
            bytes = ms.ToArray();
        }
        response.Dispose();
        return bytes;
    }
}
Once the bytestream has been downloaded (Azure.DownloadFirmwareBytes()), an Assembly is created using the bytes. The next step is to check if the assembly contains the desired interface implementation (IsSupportedAssembly()). If the assembly contains the correct interface, a check is done to see if any plug-in stored on the device needs to be replaced (UpdateModuleCollection()). In case an existing plug-in needs to be replaced, the downloaded bytes are written to the internal persistent storage memory.
class Program
{
    private static bool DownloadAssemblies(Azure azure)
    {
        FirmwareData[] data = azure.GetFirmwareData();
        if (data == null) return false;

        var updated = false;

        foreach (FirmwareData fw in data)
        {
            byte[] bytes = azure.DownloadFirmwareBytes(fw.Url);
            if (bytes != null)
            {
                string path = RootPath + fw.Url.Substring(fw.Url.LastIndexOf('/') + 1);
                Assembly assembly = Assembly.Load(bytes);
                if (IsSupportedAssembly(assembly))
                {
                    if (UpdateModuleCollection(assembly, path))
                    {
                        if (File.Exists(path)) File.Delete(path);

                        using (FileStream fspe = new(path, FileMode.CreateNew, FileAccess.Write))
                        {
                            fspe.Write(bytes, 0, bytes.Length);
                            fspe.Flush();
                            fspe.Close();
                        }
                        updated = true;
                    }
                }
            }
        }
        return updated;
    }
}
Invoke the methods on the plug-in
The UpdateModuleCollection() function contains the magic that we need to run the functionality within the plugin.
From the loaded assembly, get an object instance of the first class that is implementing the interface. This is done by getting the ConstructorInfo from the class and then Invoke() it. As a result an instance of the plug-in class is returned. Ready to be used!
Based on the type of the instance (interface type), we can get the MethodInfo the methods implemented. This is done by calling GetMethod() on the type.
Once we have the MethodInfo, we can invoke it on the instance of the plug-in class by calling the Invoke method, in which we pass in the class instance and a parameter instance.
class Program
{{

    private static bool UpdateModuleCollection(Assembly assembly, string path)
    {
        object instance = GetObjectInstance(assembly, out Type t);
        if (instance == null || t == null) return false;

        MethodInfo GetName = t.GetMethod("GetName");
        MethodInfo GetVersion = t.GetMethod("GetVersion");
        string name = GetName.Invoke(instance, null).ToString();
        int version = (int)GetVersion.Invoke(instance, null);

        foreach (Module existing in _modules)
        {
            if (existing.Name == name)
            {
                if (existing.Version < version)
                {
                    existing.Binary = assembly;
                    existing.Version = version;
                    return true;
                }
                return false;
            }
        }
        _modules.Add(new Module { Binary = assembly, Name = name, Version = version, Path = path });
        return true;
    }

    private static object GetObjectInstance(Assembly assembly, out Type referencedType)
    {
        referencedType = null;
        if (assembly == null) return false;
        foreach (Type t in assembly.GetTypes())
        {
            if (t.IsClass)
            {
                if (IsSupportedClass(t))
                {
                    ConstructorInfo ctor = t.GetConstructor(new Type[] { });
                    if (ctor != null)
                    {
                        referencedType = t;
                        return ctor.Invoke(null);
                    }
                }
            }
        }
        return null;
    }

    private static bool IsSupportedAssembly(Assembly assembly)
    {
        foreach (Type t in assembly.GetTypes())
            if (IsSupportedClass(t)) return true;
        return false;
    }

    private static bool IsSupportedClass(Type t)
    {
        Type[] interfaces = t.GetInterfaces();
        foreach (Type intf in interfaces)
            if (intf == typeof(NF_AzureIot.Interfaces.IModule)) return true;
        return false;
    }
}
Where we use oldskool reflection in the example above, the actual Execute() method of the plug-in is invoked the same way. The debug output of Visual Studio below shows that we loaded the plug-in:
“Assembly: NF_Plugin_Blinky (1.0.0.0) (240 RAM - 812 ROM - 312 METADATA)”
and that we executed all implemented methods of the interface implemented on it.
Attaching to nanoDevice...
Waiting for nanoDevice to initialize...
Debugger found. Resuming boot sequence.
Create Type System.
Loading Deployment Assemblies.
   Assembly: NF_AzureIoT (10.0.0.0)   (964 RAM - 8696 ROM - 2667 METADATA)
   Assembly: System.Device.Gpio (1.0.4.3)   (812 RAM - 5896 ROM - 2777 METADATA)
   Assembly: System.Net (1.9.0.8)   (2320 RAM - 20852 ROM - 9488 METADATA)
   Assembly: nanoFramework.Runtime.Events (1.10.0.3)   (596 RAM - 3412 ROM - 1799 METADATA)
   Assembly: nanoFramework.System.Collections (1.4.0.3)   (652 RAM - 4096 ROM - 2215 METADATA)
   Assembly: mscorlib (1.12.0.4)   (4020 RAM - 31832 ROM - 19179 METADATA)
   Assembly: nanoFramework.Json (2.1.2.3)   (1400 RAM - 18056 ROM - 4523 METADATA)
   Assembly: System.IO.FileSystem (1.0.3.3)   (1172 RAM - 9796 ROM - 3957 METADATA)
   Assembly: System.IO.Streams (1.0.1.1)   (856 RAM - 6728 ROM - 3024 METADATA)
   Assembly: nanoFramework.System.Text (1.1.3.13)   (644 RAM - 5828 ROM - 2292 METADATA)
   Assembly: System.Threading (1.0.4.3)   (608 RAM - 3884 ROM - 1668 METADATA)
   Assembly: System.Net.Http (1.4.0.23)   (4564 RAM - 53128 ROM - 18228 METADATA)
   Assembly: nanoFramework.Runtime.Native (1.5.4.3)   (404 RAM - 1568 ROM - 970 METADATA)
   Assembly: System.Device.Wifi (1.4.0.22)   (1048 RAM - 7244 ROM - 2933 METADATA)
   Assembly: nanoFramework.Azure.Devices.Client (1.0.1.30)   (1864 RAM - 20296 ROM - 7344 METADATA)
   Assembly: nanoFramework.M2Mqtt (5.0.2.24)   (3236 RAM - 45844 ROM - 14550 METADATA)
   Assembly: NF_Interface (1.0.0.0)   (160 RAM - 280 ROM - 98 METADATA)

Resolving.

Total: (22044 RAM - 247436 ROM - 97712 METADATA)


Ready.
The nanoDevice runtime is loading the application assemblies and starting execution.

Setting up WIFI networking!

Connect to Azure IoT hub using DPS.
Register Device Twin events
Hub status updated 4-{"desired":{"someProperty":"none","software":{"version":"2.0"},"Firmware":"https://acaiotsa.blob.core.windows.net/firmware/Blinky.pe","CodeVersion":18,"firmware_modules":[{"Url":"https://acaiotsa.blob.core.windows.net/firmware/NF_Plugin_Blinky.pe","Name":"NF_AzureIot.Plugin_blinky","Version":10}],"$version":10},"reported":{"someProperty":"new value #2 from device","Message":"Updating...","$version":6}}

   Assembly: NF_Plugin_Blinky (1.0.0.0)   (240 RAM - 812 ROM - 312 METADATA)

   AssemblyRef    =       12 bytes (       3 elements)
   TypeRef        =       28 bytes (       7 elements)
   FieldRef       =        0 bytes (       0 elements)
   MethodRef      =       28 bytes (       7 elements)
   TypeDef        =        8 bytes (       1 elements)
   FieldDef       =        4 bytes (       2 elements)
   MethodDef      =       12 bytes (       5 elements)
   StaticFields   =        0 bytes (       0 elements)

   Attributes      =        0 bytes (       0 elements)
   TypeSpec        =        0 bytes (       0 elements)
   Resources       =        0 bytes (       0 elements)
   Resources Files =        0 bytes (       0 elements)
   Resources Data  =        0 bytes
   Strings         =      235 bytes
   Signatures      =       44 bytes
   ByteCode        =      138 bytes

Total: (22508 RAM - 249060 ROM - 98336 METADATA)

Handling module NF_AzureIot.Plugin_blinky v10
- Initialize
- Execute
Final thoughts
Techniques shown in this post are the basis for an Over-The-Air update mechanism in which you have a fixed binary that will act as a host to run one or multiple plug-ins that are stored on the device. In the host, you have to check periodically if there are newer versions of the plug-in available after which you can download, store and execute it. The code shown is not feature complete it is a proof of concept, e.g. error handling is lacking, MD-5 checking of the downloaded file is omitted and no attempt is made to optimize the way the invoked classes are kept into memory. Optimizing the main program can be the topic for a next blog post.
I’m impressed by the work done by the Nano framework project. Reflection on such a limited device… mind blowing! Using the Visual Studio debugger on an embedded device is insanely powerful.
Exceptions thrown by the Nanoframework can be pretty vague. What I learned in this implementation is that I need reference all Nuget packages in the host, that are being used in the plug-in (e.g. System.Device.GPIO). Otherwise an exception will occur when reflection is used on the plug-in to determine if it is the correct type. This makes the Over the Air update somehow limited, as we cannot upgrade to a newer version of the Nano framework.
Many times I ran into an issue with Visual Studio locking output binaries when recompiling the code, forcing me to restart Visual Studio. Sometimes Visual Studio crashes when stepping through code. Sometimes you have to erase the device because code that worked before throws an exception.
Would I use the Nano framework for mission critical workloads? Not as this point, however the functionality and stability are improving very rapidly. For now I would resort to plain Arduino C and libraries available for it (or be a bit more adventurous and take a plunge with the Raspberry Pico board, running an embedded Python version), but my opinion might change in the near future.
For plain fun and nerdy hacking, this is a serious case of #DoEpicShit