

Register ESP32 to DPS & IoT hub - IoT with C#
In my previous post I flashed my ESP32 with the nanoframework.net, allowing me to write C# code in Visual Studio with all bells and whistles. As life goes… the device landed in my drawer until this week where I had some time to experiment. This time I wanted to hook up the device to Azure IoT hub using the Device Provisioning Service (DPS) which brings me one step closer to my goal, performing device updates over-the-air…
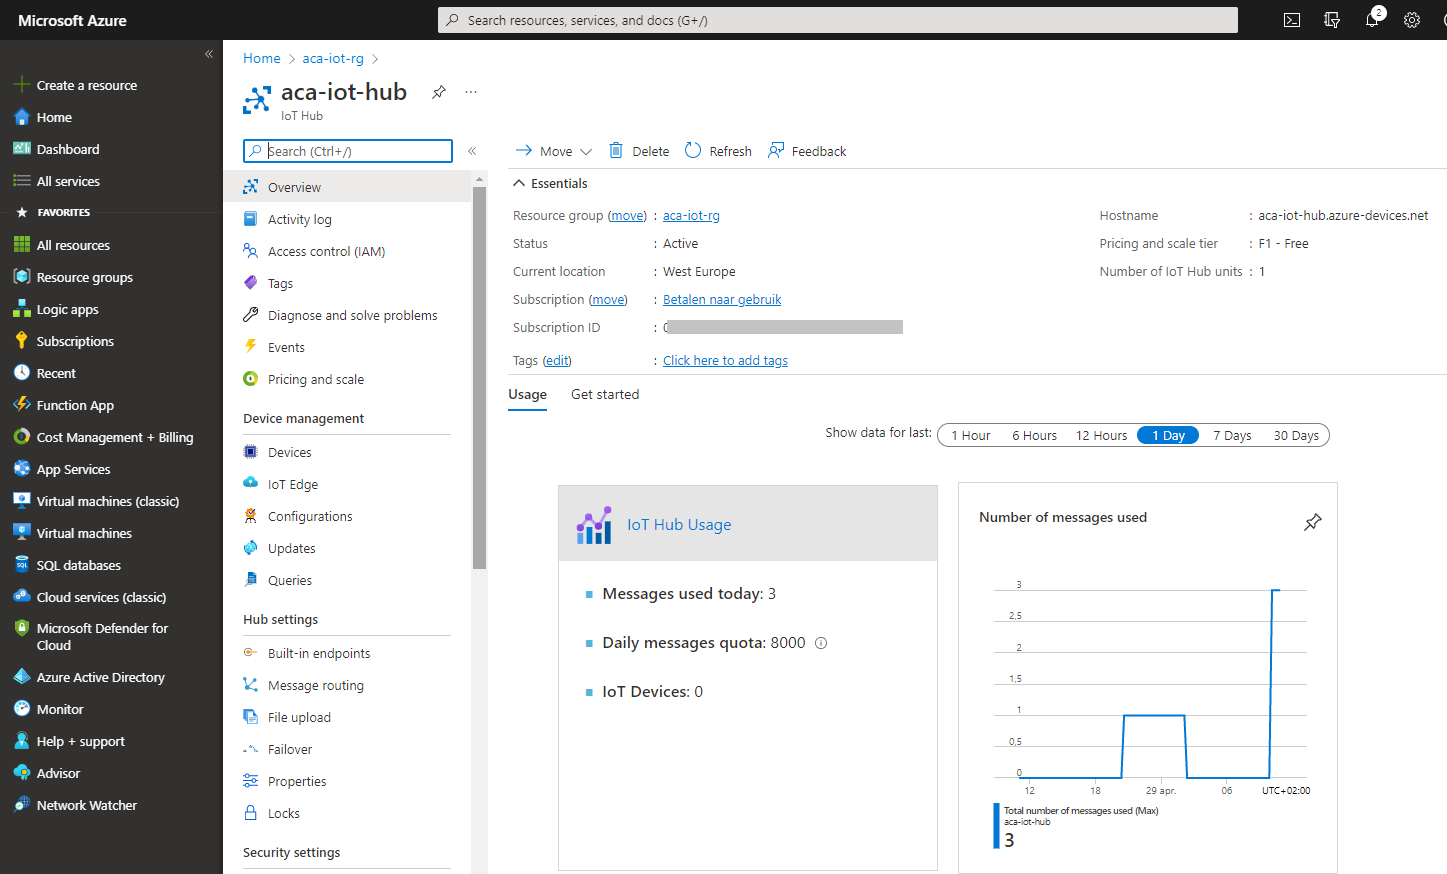
To get started I set up a new Azure IoT hub on the free tier. The F1 tier is basically the same as the Standard S1 tier, except for the number of messages allowed per day. For development and testing purposes this will do. The tier can be set in the management tab when creating the IoT hub.
Once the IoT hub was setup, the next step was to setup the Device Provisioning Service. For me the advantage of using this additional service is that I have a central place that I can use to manage my devices. For now it seems like it is overkill, but imagine that you have to commission a large number of devices. Devices with a pre-installed code base but with a destinctive configuration file (containing a device id and a device key).
Using the DPS for device enrollments allows us to rapidly register a large number of devices with a minimal amount of work. While in the other case, registering the devices on the IoT hub itself would be a painstaking process.
After setting up DPS, it needs to be tied the the Azure IoT hub, this can be done by selecting the “Linked IoT hubs” option and specify the hub we set up before.

Now DPS is setup and tied to the IoT hub, it is time to manage the enrollments, which is another word for devices that I want to provision in order to use the IoT hub.
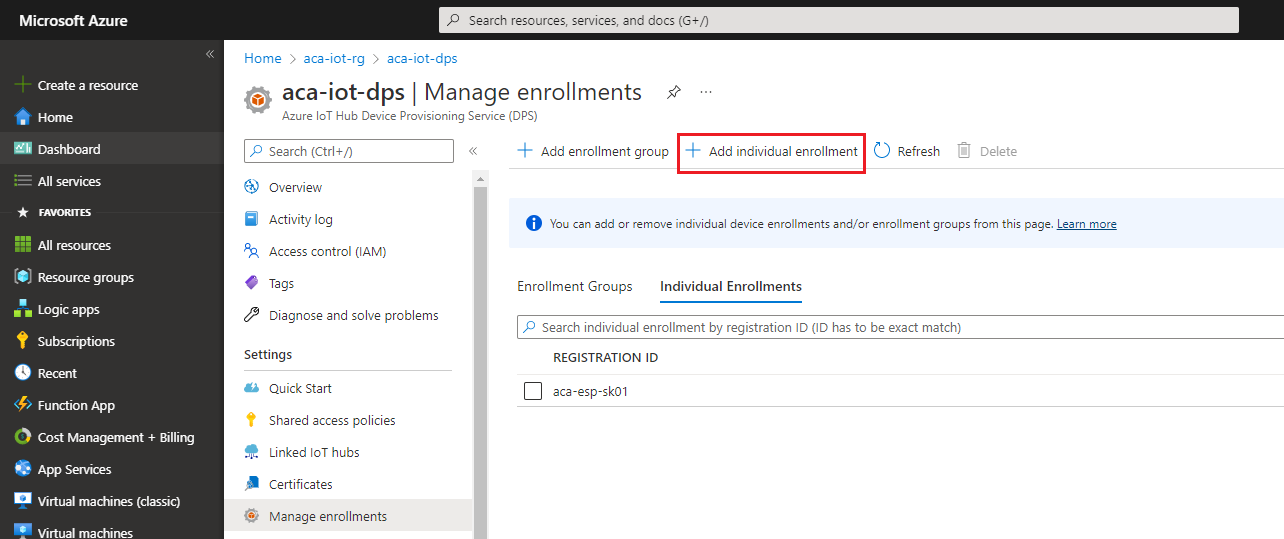
Within the enrollments, I choose for an individual enrollment (while I only have one device at my disposal). But in this section I also can choose to manage large groups of devices.
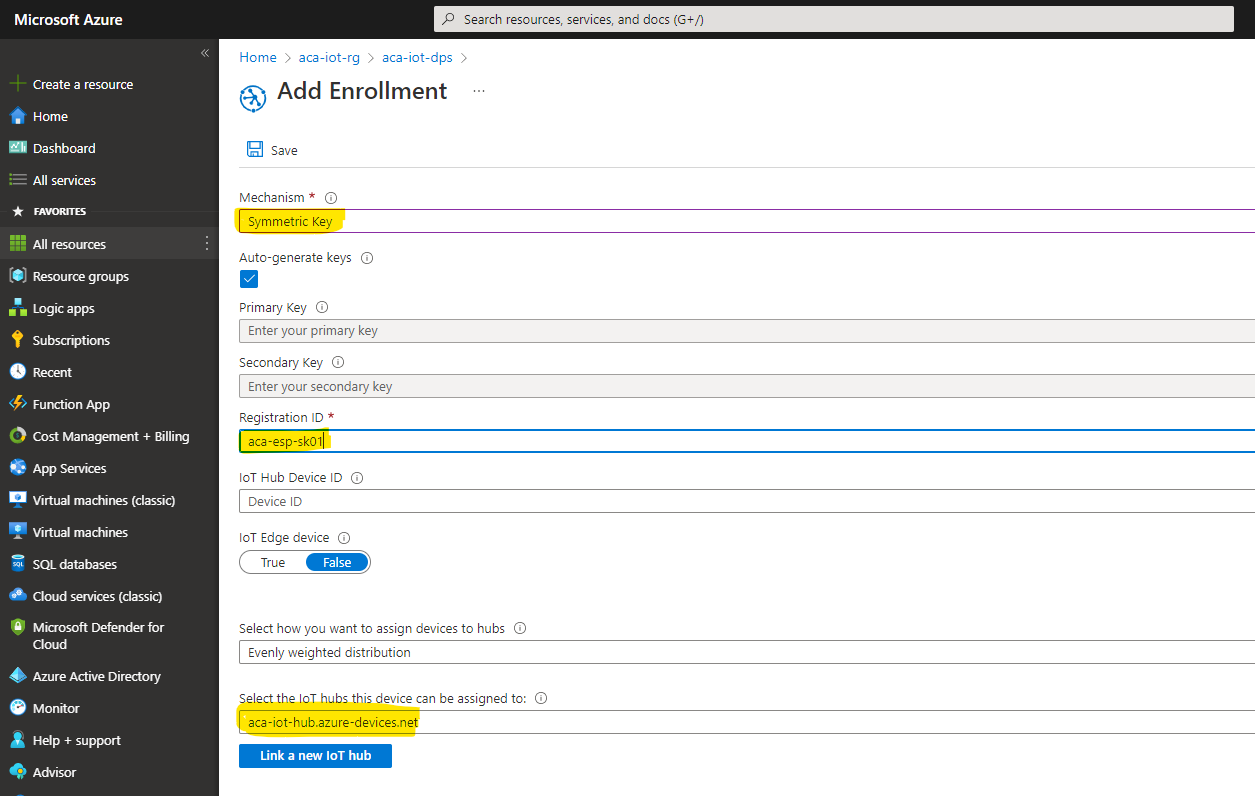
For the device that I want to enroll, I choose to use a Symmetric key, specify the registration Id (device name) and finally check the IoT hub that it is going to use.
Time to open Visual Studio and start working on my nanoframework application. These are the steps
- Connect the device to my wifi network and have a network address assigned.
- Use a global Azure certificate (AzureRootCA).
- Connect to the Azure Device Provisioning Service (DPS).
- Register the device with the given registration id in Azure Iot hub.
- Connect the registered device to the Iot hub and start using it.
The code below is straight forward:
using nanoFramework.Azure.Devices.Client;
using nanoFramework.Azure.Devices.Provisioning.Client;
using nanoFramework.Networking;
using System.Diagnostics;
using System.Security.Cryptography.X509Certificates;
using System.Threading;

namespace NF_AzureIoT
{
    public class Program
    {
        // Fill in your own wifi network ssid  + password
        private static readonly string _ssid = "MY WIFI NETWORK";
        private static readonly string _wifiPassword = "MY SECRET PASSWORD";

        // Fill in the idscope, name of the individual enrolment device, primary key (symmetric key)
        private static readonly string _deviceProvisioningEndpoint = "global.azure-devices-provisioning.net";
        private static readonly string _idScope = "ID SCOPE SPECIFIED IN THE DPS OVERVIEW";
        private static readonly string _deviceRegistrationId = "aca-esp-sk01";
        private static readonly string _deviceKey = "PRIMARY OR SECONDARY KEY SPECIFIED IN THE DPS DEVICE REGISTRATION";

        public static void Main()
        {
            Debug.WriteLine("Setting up WIFI networking!");

            if (WiFiNetworkHelper.ConnectDhcp(_ssid, _wifiPassword))
            {
                Debug.WriteLine("Connected to WIFI network...");
                Debug.WriteLine("Provisioning device through Azure IoT DPS");

                X509Certificate azureCert = new X509Certificate(AzureRootCA);
                ProvisioningDeviceClient provisioningClient = ProvisioningDeviceClient.Create(_deviceProvisioningEndpoint, _idScope,
                                                                                              _deviceRegistrationId, _deviceKey, azureCert);

                DeviceRegistrationResult myDevice = provisioningClient.Register(CancellationToken.None);
                if (myDevice.Status == ProvisioningRegistrationStatusType.Assigned)
                {
                    PrintDeviceRegistrationStatus(myDevice);

                    // Connect to IoT hub and start using it
                    var device = new DeviceClient(myDevice.AssignedHub, myDevice.DeviceId, _deviceKey,
                                                  nanoFramework.M2Mqtt.Messages.MqttQoSLevel.AtMostOnce, azureCert);
                    bool isOpened = device.Open();
                    Debug.WriteLine($"Device connected to IoT hub: {isOpened}");
                }
                else
                {
                    Debug.WriteLine($"Device could not be registered. Statuscode: {myDevice.Status}.{myDevice.Substatus}");
                }
            }
            Thread.Sleep(Timeout.Infinite);
        }

        private static void PrintDeviceRegistrationStatus(DeviceRegistrationResult myDevice)
        {
            Debug.WriteLine($"Device successfully assigned:");
            Debug.WriteLine($"  Assigned Hub: {myDevice.AssignedHub}");
            Debug.WriteLine($"  Created time: {myDevice.CreatedDateTimeUtc}");
            Debug.WriteLine($"  Device ID: {myDevice.DeviceId}");
            Debug.WriteLine($"  Error code: {myDevice.ErrorCode}");
            Debug.WriteLine($"  Error message: {myDevice.ErrorMessage}");
            Debug.WriteLine($"  ETAG: {myDevice.Etag}");
            Debug.WriteLine($"  Generation ID: {myDevice.GenerationId}");
            Debug.WriteLine($"  Last update: {myDevice.LastUpdatedDateTimeUtc}");
            Debug.WriteLine($"  Status: {myDevice.Status}");
            Debug.WriteLine($"  Sub Status: {myDevice.Substatus}");

            Debug.WriteLine("\r\nDevice registration completed. Device is now registered in IoT Hub!");
        }

        // Azure Root CA certificate. This certificate might expire in JUNE 2022
        private const string AzureRootCA = @"-----BEGIN CERTIFICATE-----
MIIDdzCCAl+gAwIBAgIEAgAAuTANBgkqhkiG9w0BAQUFADBaMQswCQYDVQQGEwJJ
RTESMBAGA1UEChMJQmFsdGltb3JlMRMwEQYDVQQLEwpDeWJlclRydXN0MSIwIAYD
VQQDExlCYWx0aW1vcmUgQ3liZXJUcnVzdCBSb290MB4XDTAwMDUxMjE4NDYwMFoX
DTI1MDUxMjIzNTkwMFowWjELMAkGA1UEBhMCSUUxEjAQBgNVBAoTCUJhbHRpbW9y
ZTETMBEGA1UECxMKQ3liZXJUcnVzdDEiMCAGA1UEAxMZQmFsdGltb3JlIEN5YmVy
VHJ1c3QgUm9vdDCCASIwDQYJKoZIhvcNAQEBBQADggEPADCCAQoCggEBAKMEuyKr
mD1X6CZymrV51Cni4eiVgLGw41uOKymaZN+hXe2wCQVt2yguzmKiYv60iNoS6zjr
IZ3AQSsBUnuId9Mcj8e6uYi1agnnc+gRQKfRzMpijS3ljwumUNKoUMMo6vWrJYeK
mpYcqWe4PwzV9/lSEy/CG9VwcPCPwBLKBsua4dnKM3p31vjsufFoREJIE9LAwqSu
XmD+tqYF/LTdB1kC1FkYmGP1pWPgkAx9XbIGevOF6uvUA65ehD5f/xXtabz5OTZy
dc93Uk3zyZAsuT3lySNTPx8kmCFcB5kpvcY67Oduhjprl3RjM71oGDHweI12v/ye
jl0qhqdNkNwnGjkCAwEAAaNFMEMwHQYDVR0OBBYEFOWdWTCCR1jMrPoIVDaGezq1
BE3wMBIGA1UdEwEB/wQIMAYBAf8CAQMwDgYDVR0PAQH/BAQDAgEGMA0GCSqGSIb3
DQEBBQUAA4IBAQCFDF2O5G9RaEIFoN27TyclhAO992T9Ldcw46QQF+vaKSm2eT92
9hkTI7gQCvlYpNRhcL0EYWoSihfVCr3FvDB81ukMJY2GQE/szKN+OMY3EU/t3Wgx
jkzSswF07r51XgdIGn9w/xZchMB5hbgF/X++ZRGjD8ACtPhSNzkE1akxehi/oCr0
Epn3o0WC4zxe9Z2etciefC7IpJ5OCBRLbf1wbWsaY71k5h+3zvDyny67G7fyUIhz
ksLi4xaNmjICq44Y3ekQEe5+NauQrz4wlHrQMz2nZQ/1/I6eYs9HRCwBXbsdtTLS
R9I4LtD+gdwyah617jzV/OeBHRnDJELqYzmp
-----END CERTIFICATE-----
";

    }
}
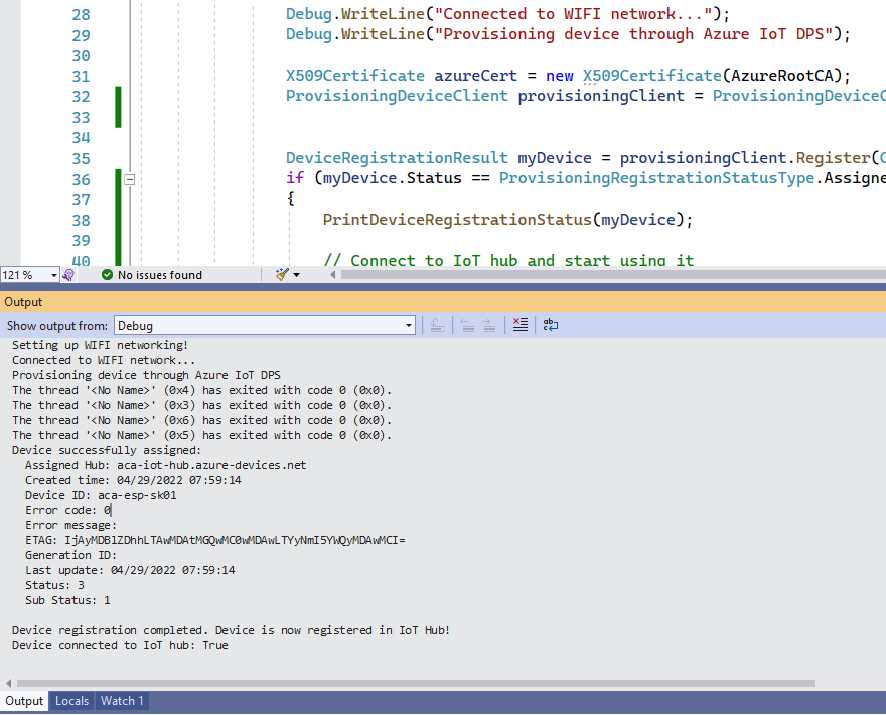
When starting the code in debug mode, the following output appears. Indicating that the device connected to the Wifi network, registered itself with the DPS, got a registration in the IoT hub and finally was connected to it.
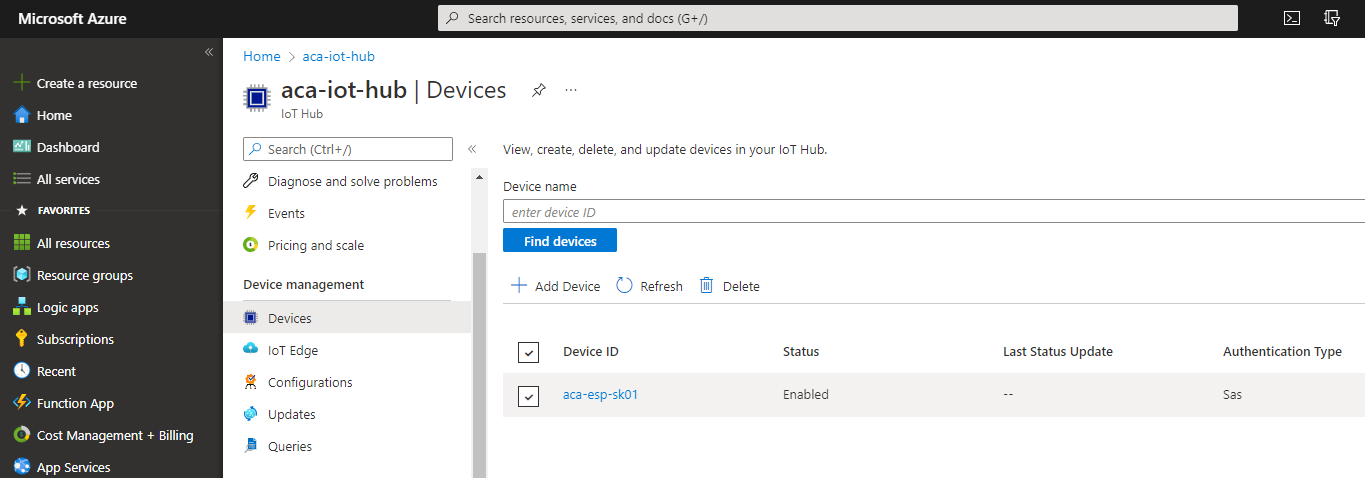
When I open the Azure IoT hub, I see that the device is registered.
With these mechanics in place, I’m a step closer to do over-the-air updates on my device. I’ll discuss more on that in a next blog post.